Get on the Right Color Management Wavelength with Monthly Insights from 10,000+ Color Professionals Around the World.
Accurate color measurement starts with a repeatable sample measurement technique. Even with a high-quality spectrophotometer, inconsistent sample preparation, positioning, aperture selection or instrument setup can reduce the accuracy of color recipes and create unreliable quality control results.
This is especially important in digital color management programs. When color data is shared across brands, suppliers, labs and production sites, every team needs to measure samples under consistent conditions. If one location measures a sample differently from another, the resulting color data may not match—even if the material itself is acceptable.
This guide explains the key best practices for measuring color samples, including sample conditioning, temperature and humidity, sample thickness, rotation, number of readings, textile sample presentation, aperture size, UV settings, instrument geometry and hyperspectral measurement for complex materials.
Color measurement accuracy depends on more than the instrument.
A spectrophotometer measures the sample presented to it. If the sample is wrinkled, translucent, textured, uneven, poorly conditioned, positioned inconsistently or measured with the wrong aperture, the data may not represent the true color of the material.
Poor measurement technique can affect:
Color recipe accuracy
Quality control decisions
Pass/fail results
Supplier approvals
Color corrections
Digital color communication
Inter-instrument agreement
Customer confidence
A strong measurement workflow should control both the sample and the instrument configuration. That means defining how the sample is conditioned, prepared, folded, positioned, rotated and measured—and ensuring that the same instrument settings are used across the supply chain.
Two Factors That Influence Color Sample Measurement
Most color measurement problems come from two areas: sample properties and instrument configuration.
Sample Properties
Sample properties include the physical characteristics of the material and how the sample is prepared for measurement. Important factors include:
Temperature and humidity
Sample conditioning
Opacity and thickness
Number of folds or layers
Sample texture
Surface directionality
Dye levelness
Positioning
Number of measurements
Backing material
Sample holder type
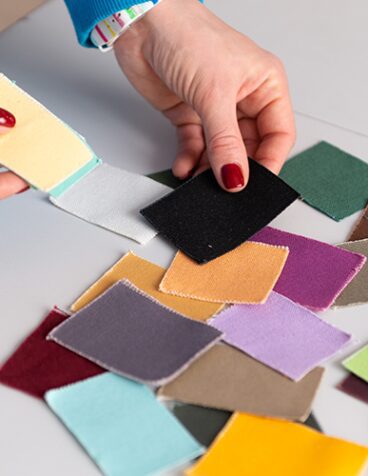
These factors matter because different materials require different presentations. A woven fabric, velvet, towel, loose fiber, yarn, lace sample or multi-color print cannot always be measured using the same method.
Instrument Configuration
Instrument configuration includes the settings and physical setup used to measure the sample. Important factors include:
Aperture size
Specular included or excluded
UV included or excluded
Instrument geometry
Calibration condition
Measurement mode
Compatibility across supply chain partners
When color data is exchanged digitally, instrument setup must be aligned between all parties. A brand, mill, supplier and lab should not use different geometries, UV settings or apertures unless the workflow specifically accounts for those differences.
What Are the Recommended Temperature and Humidity Conditions?
For many textile color evaluation workflows, laboratory standard conditions are commonly recommended: 21°C, or 70°F, and 65% relative humidity.
These conditions help reduce variation caused by environmental changes. Temperature and humidity can affect both the sample and the measurement process. If standards and batches are measured under different environmental conditions, the resulting color differences may reflect the environment rather than the true color difference.
Maintaining a full measurement area under controlled conditions can be expensive. In those cases, a conditioning cabinet can be a practical alternative. A conditioning cabinet allows samples to stabilize under consistent temperature and humidity, regardless of the room conditions.
Best practices:
Condition standards and samples before measurement.
Use consistent temperature and humidity conditions.
Avoid measuring samples immediately after production, shipping or storage changes.
Use a conditioning cabinet when full-room control is not practical.
Document conditioning conditions in the measurement SOP.
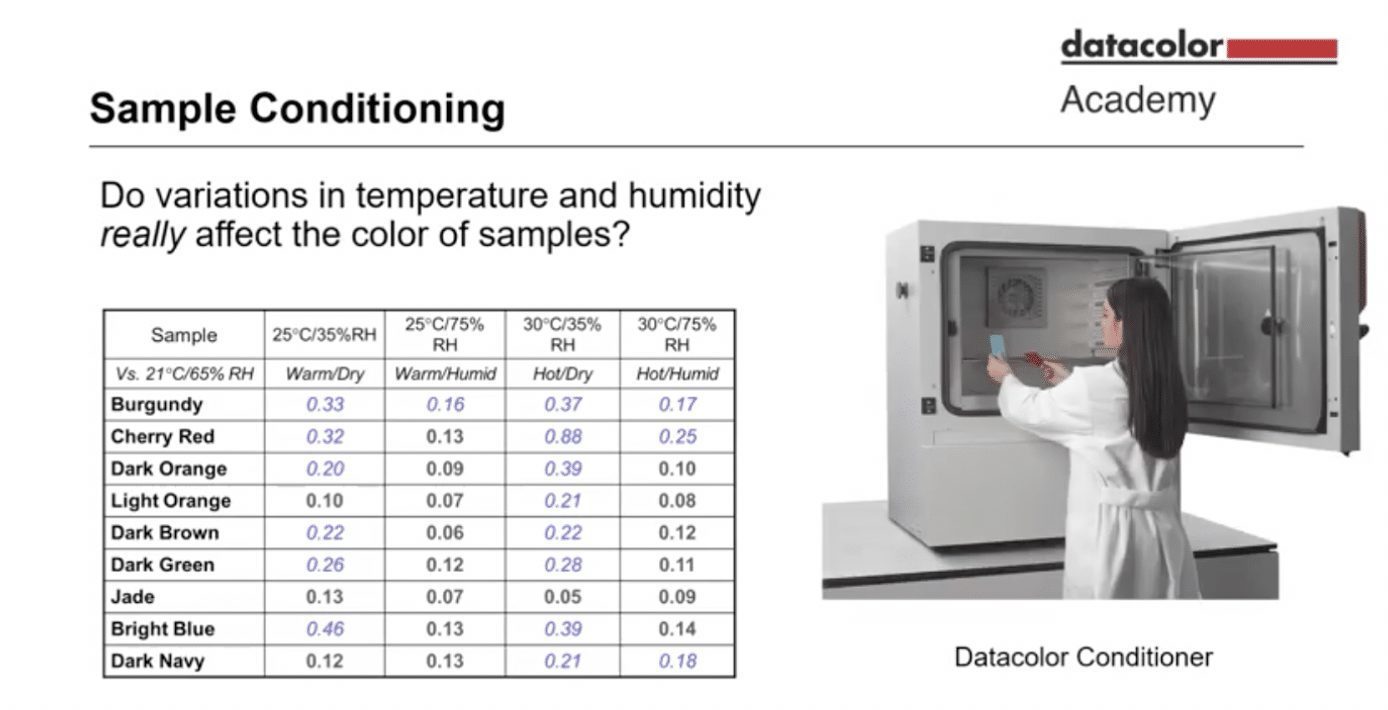
Yes. Temperature and humidity can affect measured color values, especially for certain textile samples.
In the original Datacolor test referenced in this article, nine color samples were measured under different temperature and humidity conditions. The study included browns, reds, oranges, greens and blues. The standards were measured under laboratory standard conditions, while samples were measured under different temperature and humidity conditions.
The results showed that lower humidity, especially around 35%, had a noticeable effect on some colors. Increased temperature and humidity appeared to affect the tested colors less strongly.
The key takeaway is practical: if temperature or humidity changes, do not assume the sample is unchanged. Allow the material to condition properly and remeasure standards before evaluating production samples.
For color-critical production, this is not a minor detail. Environmental variation can create unnecessary corrections, false rejects and inconsistent supplier communication.
What Is the Best Sample Thickness for Accurate Color Measurement?
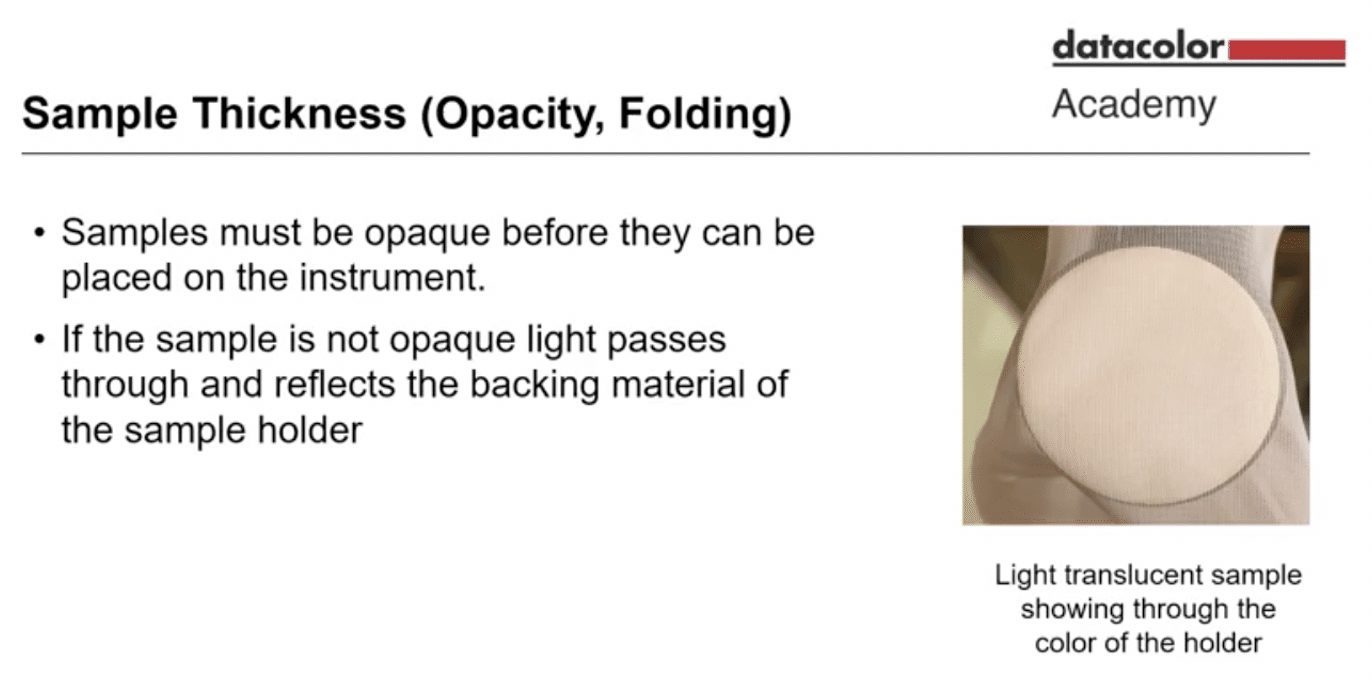
The sample should be thick enough to be opaque at the measurement port.
If the sample is translucent, the instrument may capture reflection from the sample holder, backing or material underneath. This can distort the measurement and produce inaccurate color data.
For lightweight or translucent fabrics, one layer may not be enough. A light pink chiffon sample, for example, may show the sample holder through the fabric. In that case, the sample should be folded multiple times until it becomes opaque—but not so many times that the material protrudes into the sphere.
For typical knitted or woven materials, one or two folds may be enough to achieve opacity. For very translucent samples, more layers may be needed.
A white tile backing can sometimes be used with one or two layers, but only when the standard and batch are evaluated under the same conditions and with the same white tile backing. This approach should not be used when absolute color values or color matching data are required.
Best practices:
Make sure the sample is opaque before measurement.
Use consistent folding for standards and batches.
Avoid allowing the sample to protrude into the sphere.
Use the same backing only when the workflow specifically allows it.
Document the number of layers or folds in the SOP.
How Do You Account for Variation Within a Sample?
Use multiple measurements, rotation and repositioning to account for variation in fabric construction, yarn direction, texture or uneven dyeing.
Many textile materials are not perfectly uniform. Yarns may have directionality. Dyeing may be slightly uneven. Texture may cause different readings depending on how the sample is positioned. A single measurement may not represent the full sample accurately.
A recommended approach for many fabric samples is:
Fold the sample once.
Fold it a second time.
Place it into the instrument and take the first measurement.
Rotate the sample 90 degrees and measure the back side.
Re-fold the sample in the other direction.
Measure again at 0 degrees.
Rotate 90 degrees and measure the other side.
Average the readings.
This helps reduce the influence of directionality, construction and local sample variation.
For textured materials such as high-pile fabrics, measure the sample, remove it from the instrument, reposition it and measure again. Continue until the variation between measurements is acceptable for your workflow.
For a demo of how to determine the ideal number of measurements using Datacolor Color Measurement Tools, watch the video below:
The correct number of measurements depends on the material, texture, uniformity and required tolerance.
Uniform materials may require fewer readings. Textured, directional, high-pile, variegated or uneven materials usually require more readings. The goal is to capture a representative average of the sample rather than one isolated area.
As a general rule:
Take more measurements for textured or uneven materials.
Rotate and reposition the sample between readings.
Average the results.
Use the same number of readings for the standard and batch.
Document the required number of readings by material type.
A larger measured area and more averaged readings usually improve repeatability, especially for materials with texture or variation.
How Do You Measure Towels, Carpets, Fleece, Velvet and Other Textured Samples?
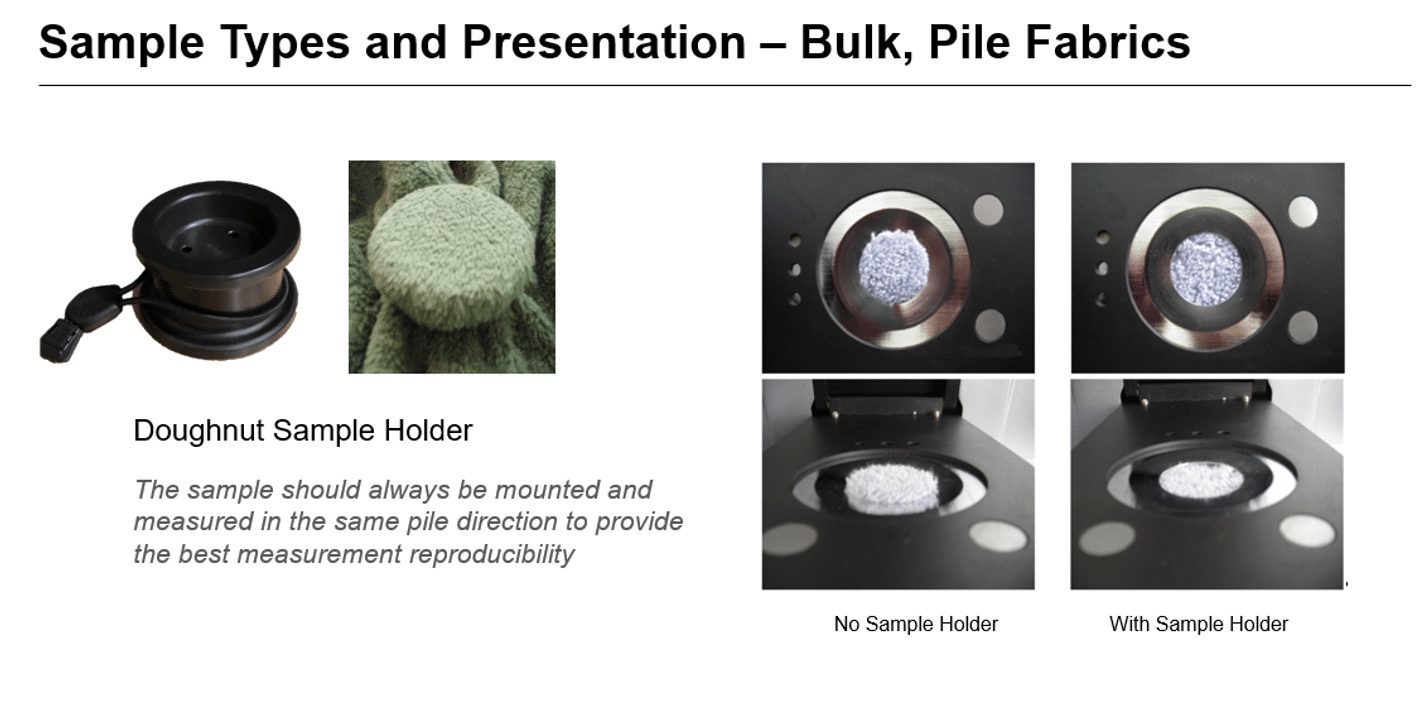
Use a sample holder to keep textured materials flat, uniform and repeatable during measurement.
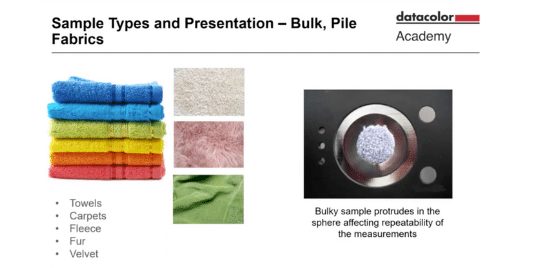
Materials such as towels, carpets, fleece, fur and velvet can be difficult to measure because pile height, nap direction and texture affect how the surface reflects light. If the material is not held consistently, measurements may vary.
A common solution is a doughnut-style sample holder. This type of holder uses a cylinder and rubber band to keep the material uniform and flat while measurements are taken.
Even with a sample holder, these materials still require multiple measurements with rotation. Texture and pile direction can create variation, so a single reading is rarely enough.
Best practices:
Use a suitable sample holder.
Keep the sample flat and uniform.
Rotate the sample between readings.
Average multiple measurements.
Apply the same procedure for standard and batch.
Document the holder and technique used.
How Do You Measure Loose Fibers?
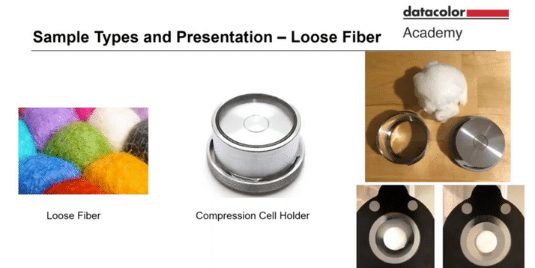
Loose fibers should be measured with a compression cell holder to control sample presentation and prevent protrusion into the sphere.
Loose fibers are difficult to measure because they can vary in density, pressure, orientation and surface presentation. If they protrude into the sphere or are compressed inconsistently, measurement results can change.
A compression cell holder helps solve this by applying controlled presentation. Place an exact weight of fiber into the holder, then close it tightly so the sample is presented consistently.
Best practices:
Use the same fiber weight every time.
Apply consistent compression.
Prevent protrusion into the sphere.
Measure standards and batches with the same method.
Use specular excluded measurement when glass effects need to be removed.
Document fiber weight, holder type and measurement setting.
Consistency is essential. If the amount of fiber or pressure changes, the measured color may also change.
How Do You Measure Yarn?
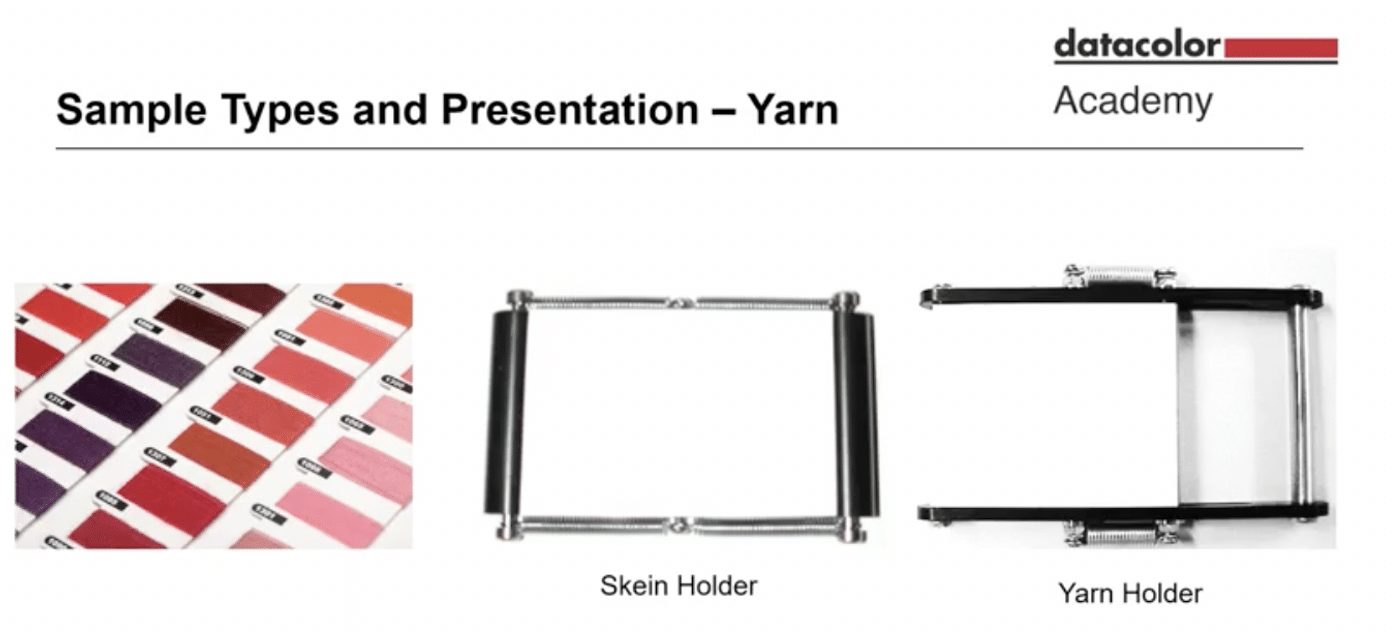
Yarn can be measured using a compression holder, yarn holder, skein holder or controlled card-winding method.
The goal is to present the yarn in a repeatable way with consistent density, direction and tension. If yarn tension changes, the measured color may also change because the surface presentation changes.
Common yarn presentation methods include:
Winding yarn around a card
Using a skein holder
Using a yarn holder with springs
Using a compression holder for certain sample types
Best practices:
Apply controlled tension.
Use the same yarn presentation method every time.
Keep yarn density consistent.
Avoid gaps or uneven winding.
Measure standards and batches with the same holder.
What Aperture Size Should You Use for Textile Samples?
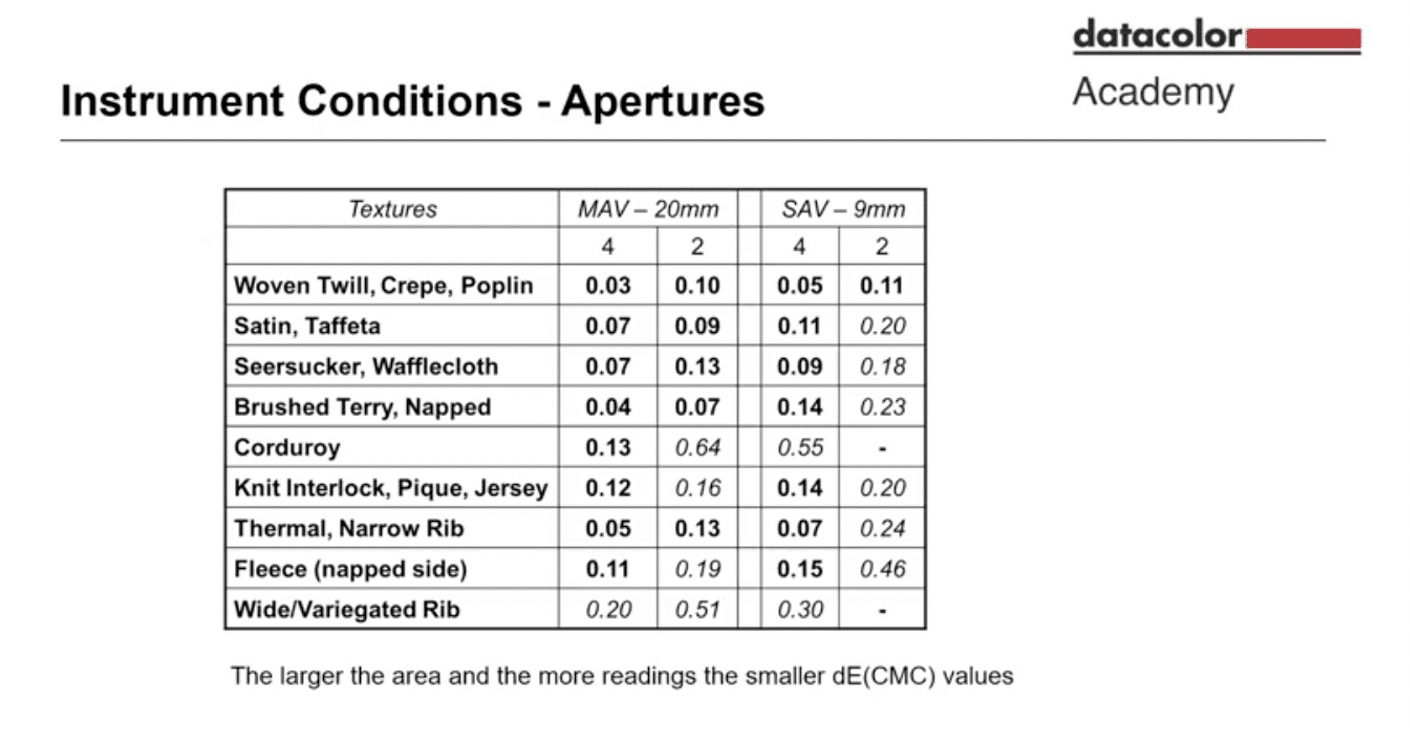
Use the largest aperture that is practical for the sample size and material type.
A larger aperture measures a larger area, which usually provides a more representative reading. This is especially useful for textured, variegated or non-uniform samples. A small aperture may be necessary for small samples, but it can increase variation because it captures a smaller part of the material.
Many brand programs recommend medium or large aperture settings for textile measurement when sample size allows.
In the Datacolor example, samples measured with a medium aperture and more averaged readings produced more consistent results than samples measured with a small aperture or fewer readings. This is especially true for materials such as corduroy, variegated rib and fleece.
Best practices:
Use the largest aperture the sample can support.
Avoid small apertures unless required by sample size.
Take more readings for textured or uneven materials.
Use the same aperture for standard and batch.
Align aperture settings across supply chain partners.
What UV Condition Should You Use for Color Measurement?
UV settings should be chosen based on the material and brand or customer requirements.
Many brand programs recommend measuring textile color samples with UV excluded. This can help reduce variation when optical brighteners are not part of the intended measurement condition.
However, for white materials, fluorescent white materials or samples treated with optical brightening agents, the instrument may need to be calibrated for UV. These materials respond differently because fluorescence can affect perceived and measured color.
Best practices:
Follow brand or customer requirements.
Use UV excluded when specified by the program.
Calibrate for UV when measuring fluorescent whites or optical brighteners.
Document UV settings in the SOP.
Keep UV settings consistent across all supply chain partners.
Instrument geometry affects how light interacts with the sample and how the reflected light is detected.
Different geometries are not automatically compatible. A spherical geometry and a directional geometry can produce different data for the same sample. If one supplier measures with diffuse/8° and another measures with 45°/0°, the results may not agree.
This is why geometry must be standardized when color data is exchanged digitally across the supply chain.
Best practices:
Use the geometry required by the brand or customer.
Do not compare data from incompatible geometries.
Align geometry settings across sites and suppliers.
Document geometry in every color standard and SOP.
Use the same geometry for standards and production samples.
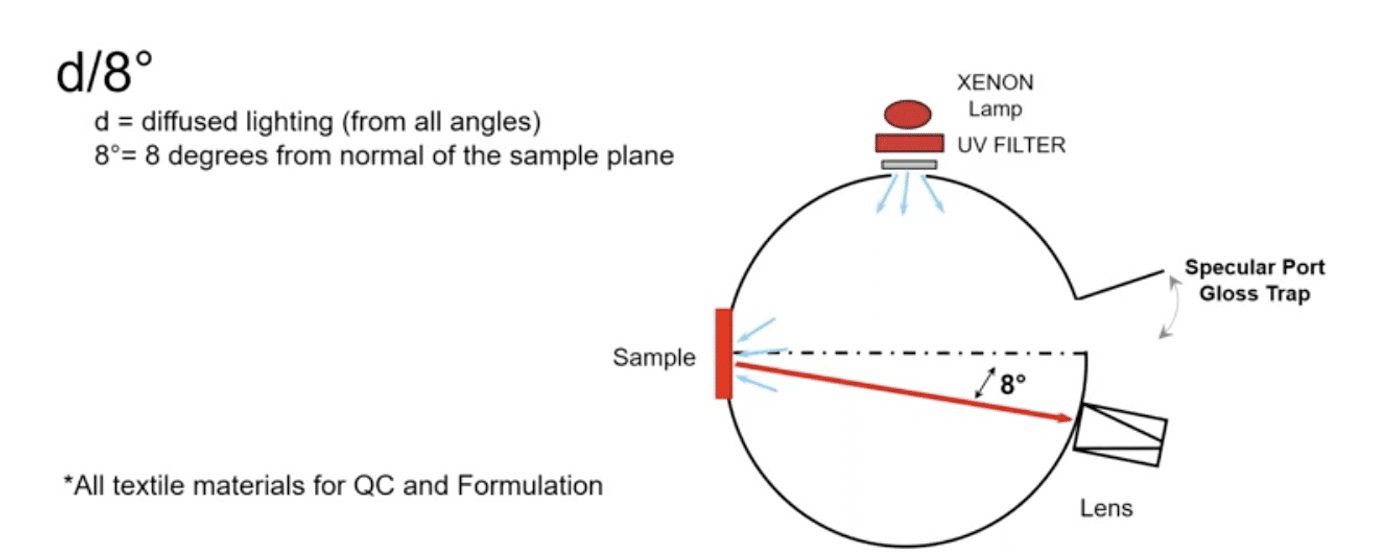
Diffuse/8° geometry uses diffuse illumination and detects reflected light at an 8-degree angle from the sample.
In a spherical d/8° instrument, light first hits the highly reflective walls of an integrating sphere. This diffused light illuminates the sample. The detector then measures the sample at 8 degrees.
This geometry can include or exclude the specular component, depending on whether the specular port is closed or open.
When the port is closed, gloss or specular reflection is included.
When the port is open, gloss or specular reflection is excluded.
Diffuse/8° geometry is commonly used in textile color quality control and formulation workflows.
Diffuse/0° geometry also uses diffuse illumination, but the detector is positioned at 0 degrees from the sample.
Unlike diffuse/8° geometry, diffuse/0° geometry does not have a specular port. Measurements are specular excluded by default.
Diffuse/0° geometry is commonly recommended for paper and paper manufacturing products. Some textile standards may also recommend diffuse/0° geometry, depending on the application.
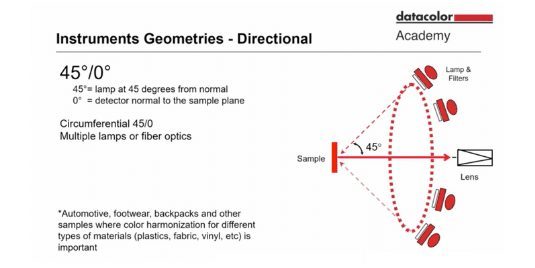
In 45°/0° geometry, the sample is illuminated at 45 degrees and detected at 0 degrees. In 0°/45° geometry, the sample is illuminated at 0 degrees and detected at 45 degrees.
Directional geometries are often used in automotive, food and multi-material applications where appearance and surface direction matter. They may also be useful when a final product includes components made from different materials, such as textile, plastic and vinyl, that need to appear visually consistent.
How Do You Measure Multi-Color Prints, Lace, Trims and Zippers?
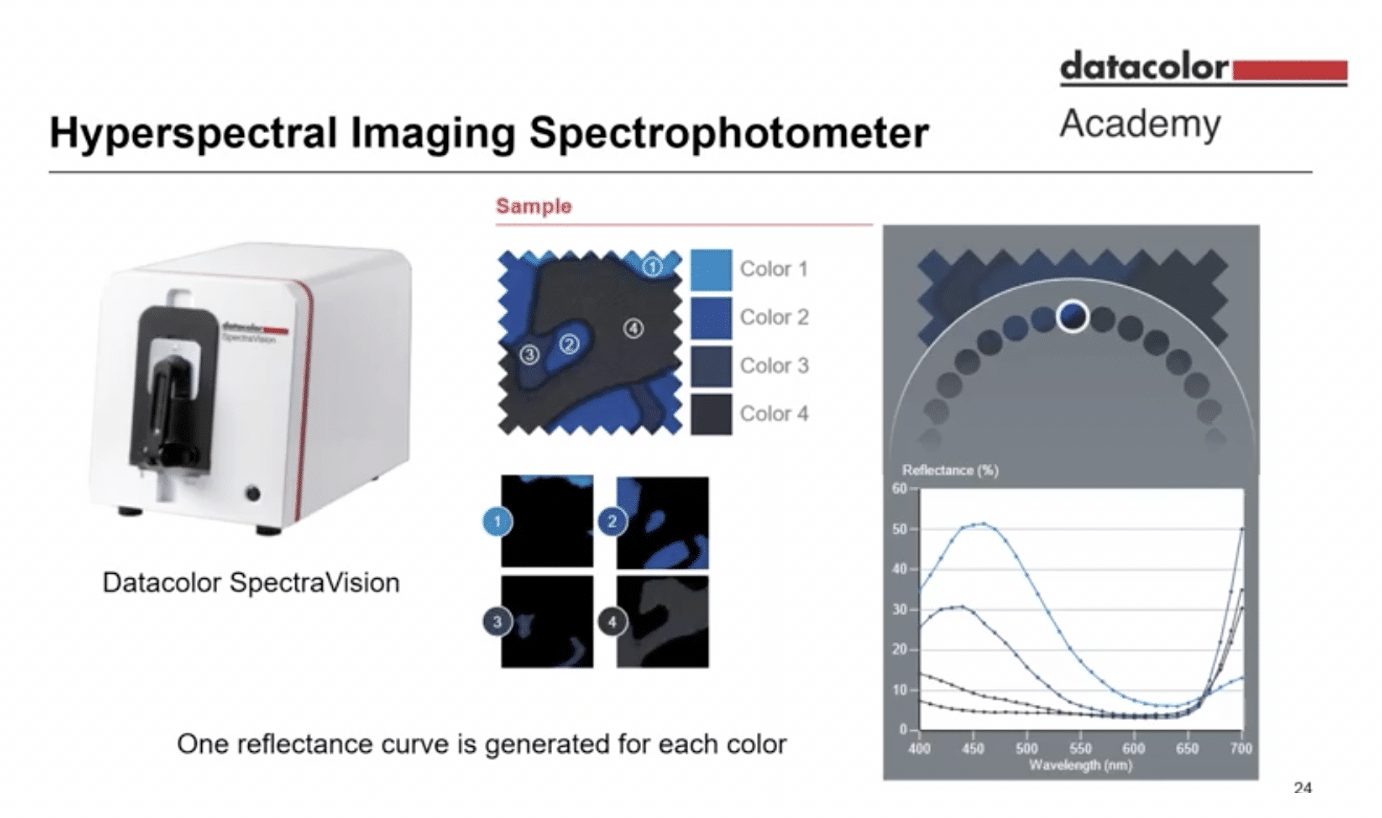
Multi-color prints, lace, trims, buttons and zippers often require hyperspectral imaging because they are not single-color, uniform samples.
Traditional spectrophotometers measure an area and typically return an averaged value. That may not work well for complex samples with multiple colors, openings, shadows, texture or small components.
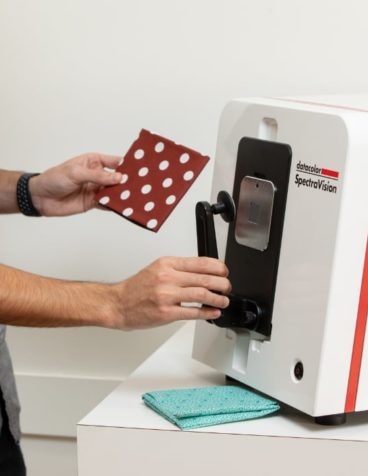
A hyperspectral imaging spectrophotometer captures color information across multiple wavelengths and separates the colors in the sample. In the example from the source article, the instrument captures images from 400 to 700 nanometers and can generate reflectance curves for each color in a print.
This approach can also work for lace. Once the colors are separated, the background can be discarded, allowing the software to generate a reflectance curve for the lace material itself.
Checklist: Best Practices for Measuring Color Samples
Use this checklist to improve repeatability before measuring a standard or production sample:
Sample Measurement Check
Completed
Condition samples to the required temperature and humidity.
Yes / No
Use the same conditioning method for standards and batches.
Yes / No
Make sure the sample is opaque at the measurement port.
Yes / No
Use consistent folds, layers or backing when required.
Yes / No
Keep the sample flat and properly positioned.
Yes / No
Rotate and reposition samples between measurements.
Yes / No
Average multiple readings for textured or uneven materials.
Yes / No
Use the correct sample holder for loose fibers, yarns or high-pile fabrics.
Yes / No
Use the largest suitable aperture for the sample.
Yes / No
Keep aperture size consistent across standards and batches.
Yes / No
Define whether UV should be included or excluded.
Yes / No
Use the same instrument geometry across all supply chain partners.
Yes / No
Calibrate the instrument according to the required procedure.
Yes / No
Document every key measurement setting in the SOP.
Yes / No
How Better Sample Measurement Improves Digital Color Management
Better sample measurement improves the quality of the entire color workflow.
When standards and production samples are measured consistently, color data becomes more reliable. This helps teams create better recipes, make stronger QC decisions, reduce unnecessary corrections and communicate more effectively across the supply chain.
How Datacolor Supports Accurate Sample Measurement
Datacolor supports accurate and repeatable sample measurement with spectrophotometers, software, sample presentation tools and color management expertise.
With the right sample preparation, instrument settings and measurement procedure, color teams can produce data that is more accurate, repeatable and useful across design, production and quality control.
FAQ: Measuring Color Samples
Why Is Sample Preparation Important in Color Measurement?
Sample preparation is important because the instrument measures the sample as presented. Wrinkles, translucency, texture, backing, tension, pile direction or uneven positioning can all affect the result.
What Temperature and Humidity Should Textile Samples Be Conditioned At?
Many textile color evaluation workflows use laboratory standard conditions of 21°C, or 70°F, and 65% relative humidity.
How Thick Should a Sample Be for Color Measurement?
The sample should be thick enough to be opaque at the measurement port. Translucent samples may need multiple folds or layers to prevent the instrument from reading the backing or sample holder.
Why Should Samples Be Rotated Between Measurements?
Rotation helps account for directionality, texture, yarn construction and uneven dyeing. It produces a more representative average of the sample.
How Many Readings Should I Take per Sample?
The number depends on the sample type. Uniform materials may need fewer readings, while textured, uneven or directional materials usually need more readings with rotation and repositioning.
What Aperture Size Is Best for Textile Measurement?
Use the largest aperture the sample can support. Larger apertures measure a broader area and usually improve repeatability for textured or non-uniform samples.
Should UV Be Included or Excluded?
That depends on the material and customer requirements. Many textile programs use UV excluded, while fluorescent whites or materials with optical brighteners may require UV calibration.
Why Does Instrument Geometry Matter?
Geometry determines how light illuminates the sample and how reflected light is detected. Different geometries can produce different results, so standards and batches should be measured with the same geometry.
How Do You Measure Lace or Multi-Color Prints?
Lace, multi-color prints, trims and zippers may require hyperspectral imaging, which separates the colors in the sample and can generate reflectance data for each color area.
Ready to Improve Your Sample Measurement Workflow?
If inconsistent sample measurements are affecting color recipes, QC decisions or supplier communication, Datacolor can help you define a more repeatable workflow for your materials, instruments and production needs.

 Want to Get Color Right?